
WWII Hungarian Infantry

Bryan’s step by step painting guide
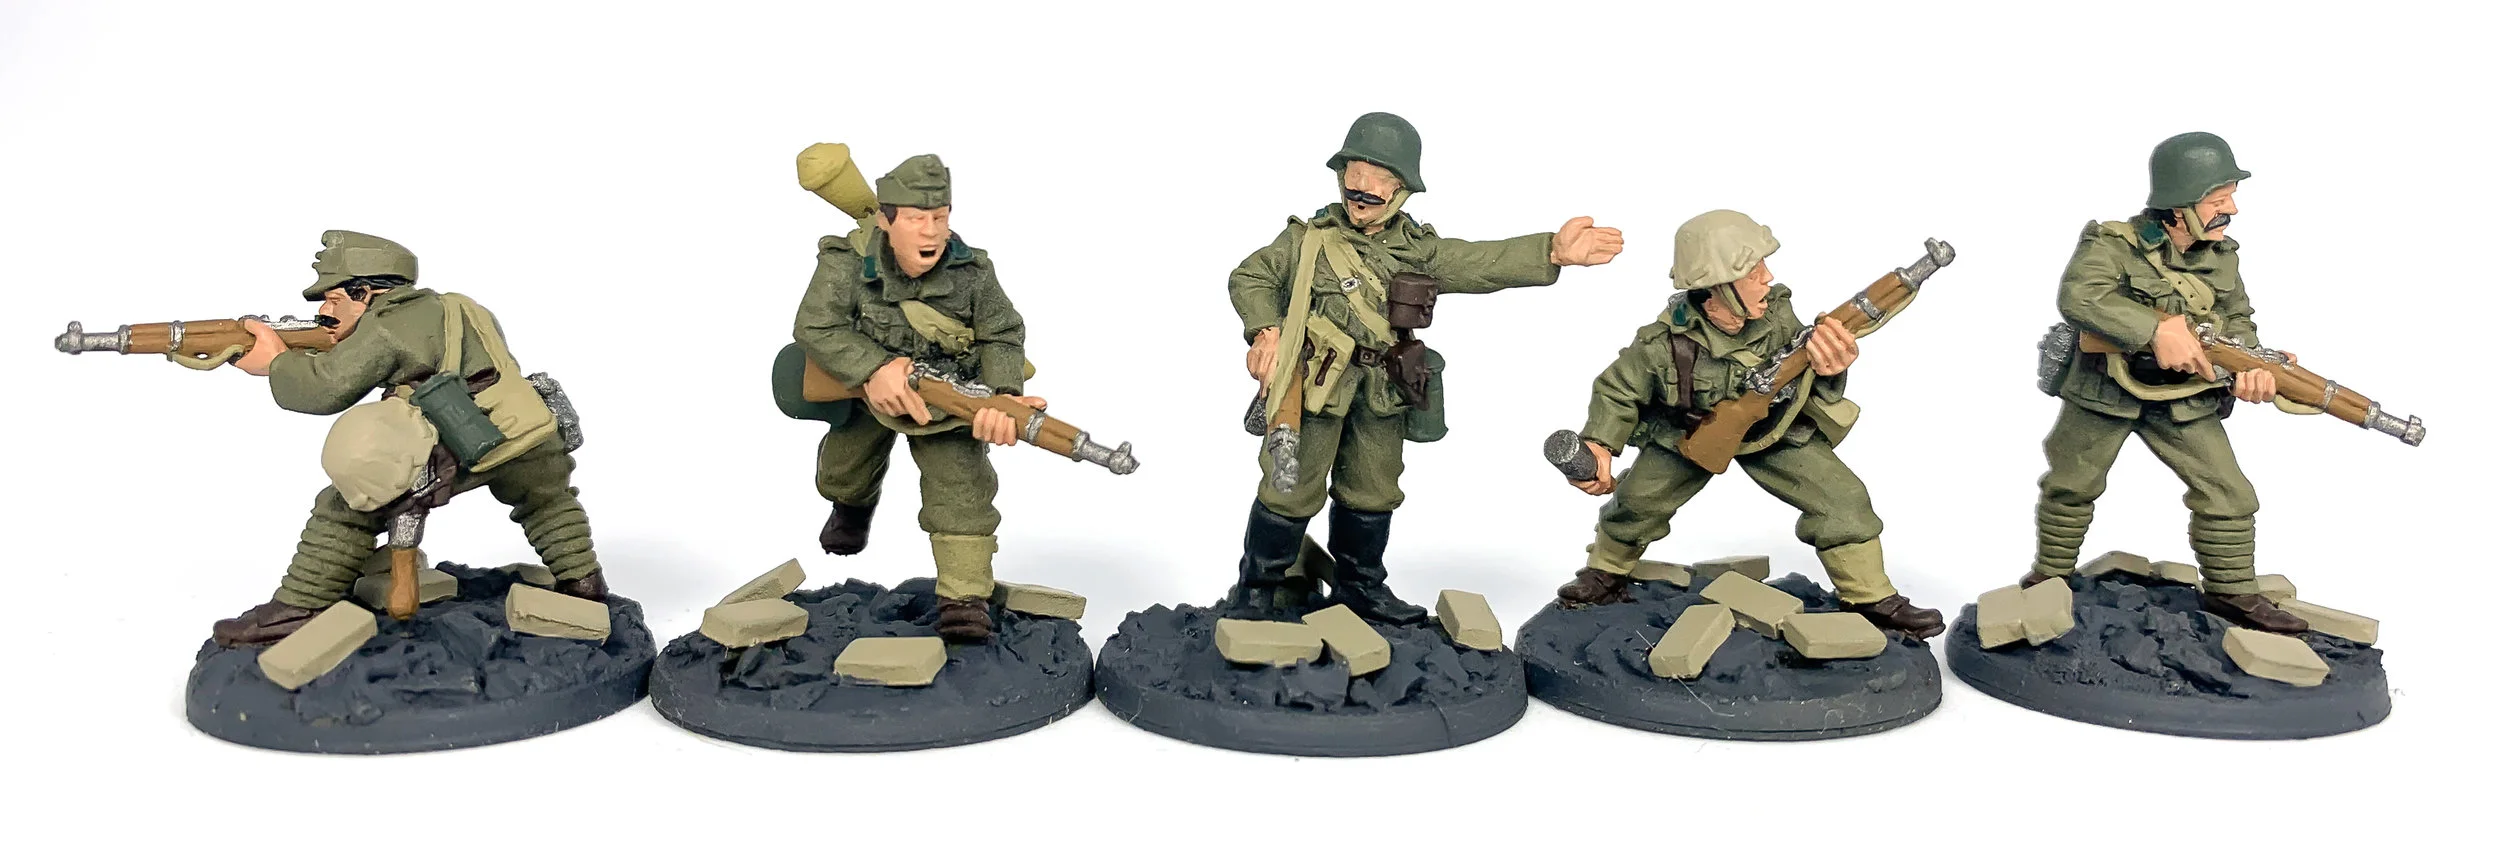
Welcome to a painting guide for the Royal Hungarian Army of the Second World War. This Axis ally of Germany on the Eastern Front had an interesting mix of contemporary equipment and dress as well as throwbacks to the old Austro-Hungarian Empire. Read on to find out how to paint your stout Hungarian riflemen step by step.

Before applying any paint, it’s a good idea to add any materials you are using to texture your bases. This saves time later as the spray primer will cover this too. In this example I am going to create urban looking bases to represent a force fighting in the siege of Budapest. To create a an impression of rubble I’ve used polly-filla from the hardware store smeared over the base to obscure the metal tab at the miniatures feet. Once dry, I have glued on some 1:48 scale bricks from a company called Juweela.
I highly recommend painting your Hungarians in batches of 5-10 models, as this method is most efficient for getting your army completed and on the table.
Step 1 - Coloured spray primer

As the heading says, I sprayed my miniatures with a coloured spray primer, Plastic Soldier Company US Armour. This spray for US Tanks is actually the equivalent of the main uniform colour for the Hungarians, Brown Violet from Vallejo, which we will use later. This spray is nice and thin so it didn’t obscure any details. Most importantly it saves a massive amount of time to be able to prime and lay down the main model colour in one hit with a spray can.
You could also undercoat your minis with a more traditional black undercoat, just be sure to paint the main uniform colour with your brush in the next step.
Step 2 - Base colours
Next, it’s time to paint on the rest of the basic colours using a brush. I tend to use a decent sized brush with a good point, size 1. Be sure to thin your paints with a little water so they apply smoothly. Some colours will benefit from a second thin coat to give a solid coverage.
Uniform and puttees (leg wraps): Brown Violet (Vallejo). Note this is already done if you sed the coloured spray primer in step 1.
Helmet, gas mask canister: German Camo Dark Green (Vallejo)
Flesh: Cadian Fleshtone (Citadel)
Wooden gun stock: Flat Earth (Vallejo)
Metal gun barrel, water bottle, grenade heads, shovel blades: Leadbelcher (Citadel)
Gun slings, canvas bags and straps, SMG ammo pouches, gaiters: Khaki (Vallejo)
Jackboots, some hair and moustaches: Matt Black (Army Painter)
Belt, rifle ammo pouches, binocular case, low cut boots, some hair and moustaches: Rhinox Hide (Citadel)
Camouflage helmet covers: German camo beige (Vallejo)
Panzerfaust: Middlestone (Vallejo)
Infantry collar tabs: Caliban Green (Citadel). Note these are coloured by the branch of the army the men are from, green for infantry, blue for motorised infantry, red for artillery.
Bases: German Grey (Vallejo) for the rubble and German camo beige (Vallejo) for the bricks.

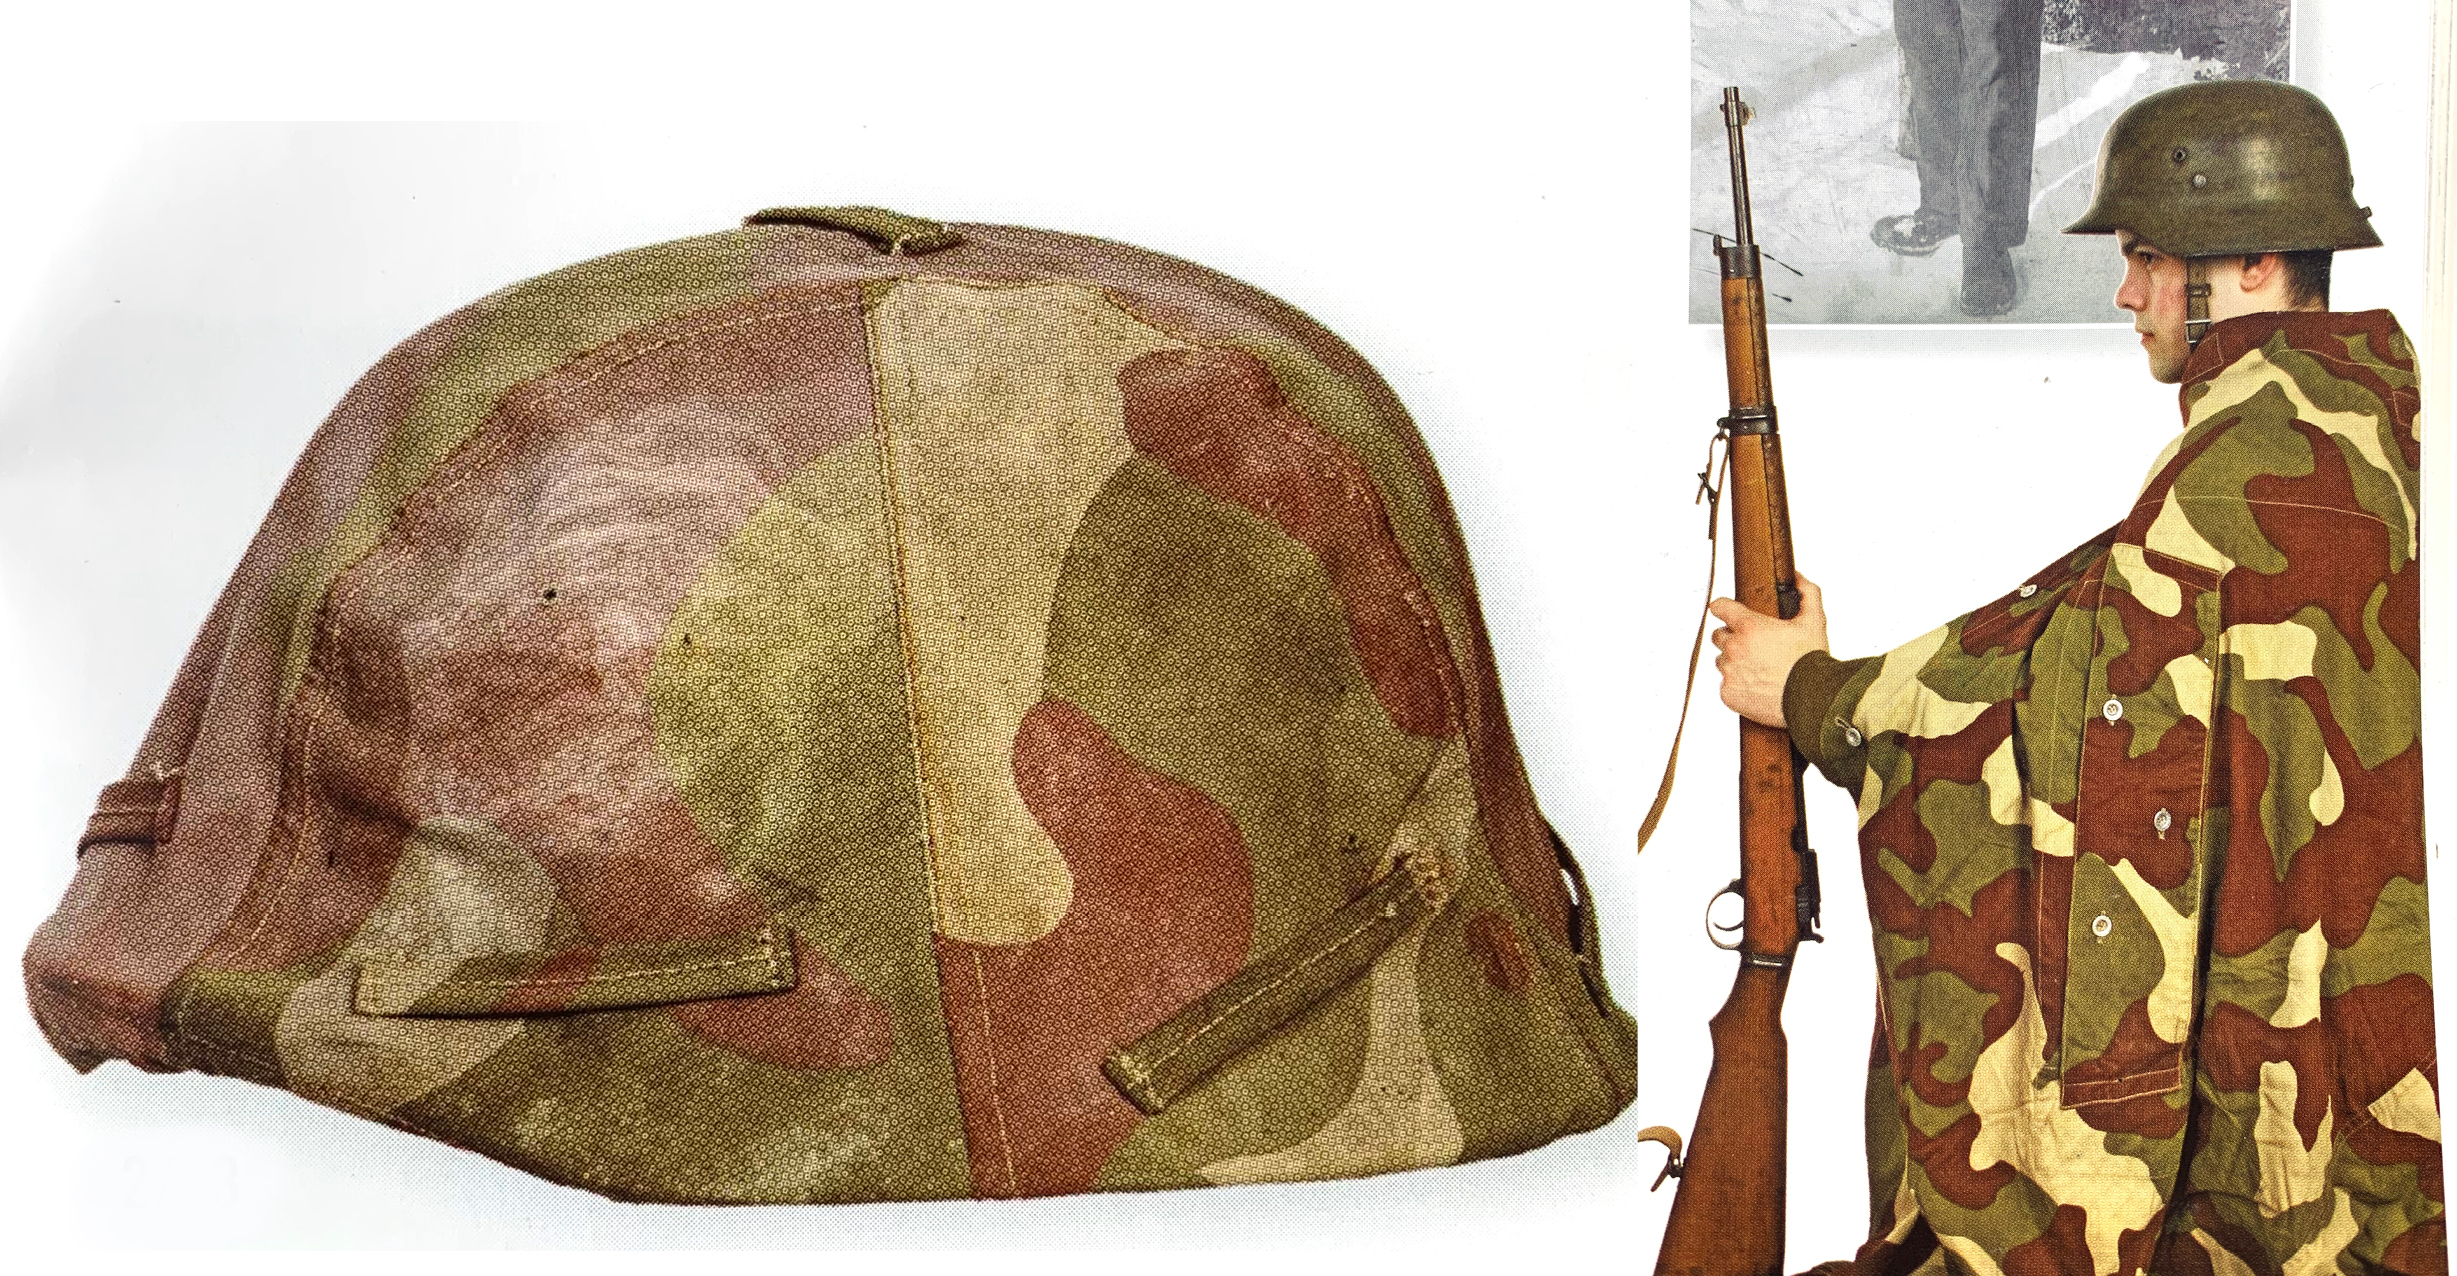
Step 3 - Camouflage pattern

The Hungarians used their own three colour colour camouflage pattern as pictured below. The M1938 design consisted of dark reddish-brown and olive green shapes on a khaki background. The base colour has already been applied in the previous stage. Using a fine detail brush it’s time to add the second and third colours of the pattern as shown above. Be sure to thin your paints so you can easily create smooth shapes. The green pattern shapes can be spaced out to allow the later brown to overlap but not cover too much of the beige.
Camouflage base colour: German Camo Beige (Vallejo)
Camouflage colour 1: Medium Olive (Vallejo)
Camouflage colour 2: Flat Brown (Vallejo)
Step 4 - Highlighting

Time to begin creating some depth by highlighting the raised areas of the model. I apply washes after the highlights are laid down as this well help blend the highlights with the base colours underneath. This post highlight wash cuts out several stages of blending that would normally require mixing colours. Remember to be deliberate with your brushstrokes and don’t cover too much of the base colour underneath when applying your highlights. Note that two areas, the wooden gun stocks and khaki webbing & gaiters are not highlighted at this point. Those two areas a better highlighted AFTER the washes have been applied in the next step.
Uniform and puttees (leg wraps): Brown Violet (Vallejo) over most of the raised surface area and then a fine edged highlight of Khaki (Vallejo)
Helmet, gas mask canister: Olive Grey (Vallejo) over most of the raised surface area and then a sponged on highlight of Yellow Green (Vallejo) using a piece of foam as shown below. This is great for giving the metal wargear a beaten up look.

Flesh: Kislev Flesh (Citadel), and then Flayed One Flesh (Citadel).
Jackboots, some hair and moustaches: German Grey (Vallejo)
Belt, rifle ammo pouches, binocular case, low cut boots, some hair and moustaches: 70/30 mix of Rhinox Hide (Citadel) & Iraqi Sand (Vallejo)
Camouflage helmet covers: For the green areas a mix of 30/70 Iraqi Sand (Vallejo) and Medium Olive (Vallejo). For the brown areas a mix of 30/70 Iraqi Sand (Vallejo) and Flat Brown (Vallejo). Don’t highlight the khaki areas.
Panzerfaust: Iraqi Sand (Vallejo)
Infantry collar tabs: Medium Olive (Vallejo).
Bases: Dry brush of Stone Grey (Vallejo) over the entire base.
Step 5 - Washes

As previously mentioned I like to apply washes after highlighting as I find it does a lot of the blending work between the highlights and base colours for me, as well as adding the shadows. I mix in some flow medium (Lahmian Medium by Citadel) with my washes rather than water. This allows the wash to say strong in pigment but direct it’s flow more toward the recesses, rather than just stain the whole area equally. A ratio of about 20/80 medium to wash is a good mix.
Uniform, wooden gun stock, gun slings, canvas bags and straps, SMG ammo pouches, gaiters, panzerfaust: Agrax Earthshade (Citadel).
Helmet, gas mask canister: 60/40 mix of Biel Tan Green and Nuln Oil (Citadel).
Flesh: Riekland Fleshshade (Citadel)
Metal gun barrel, water bottle, grenade heads, shovel blades: Nuln Oil (Citadel)
Camouflage helmet covers: Agrax Earthshade (Citadel).
Bases: 70/30 mix of Agrax Earthshade and Nuln Oil (Citadel).
Step 6 - Finishing touches

To finish off our Hungarians there are a few finishing touches to make. The first is to highlight the two areas that were not done prior to the washes like the rest.
Wooden gun stock: Orange Brown (Vallejo). Note, you can attempt to give the impression of woodgrain by painting on the swirly lines with a fine detail brush and this highlight colour.
Gun slings, canvas bags and straps, SMG ammo pouches, gaiters: German camo beige (Vallejo)
Next tep is entirely optional, painting the eyes. These are tricky but the way I tackle them is to paint a horizontal line of white paint first. The shading in the eye socket has already been put in place by the wash, so will surround this white line. To finish it off I carefully paint a single black dot for a pupil, making sure they are looking in the same direction for both eyes.
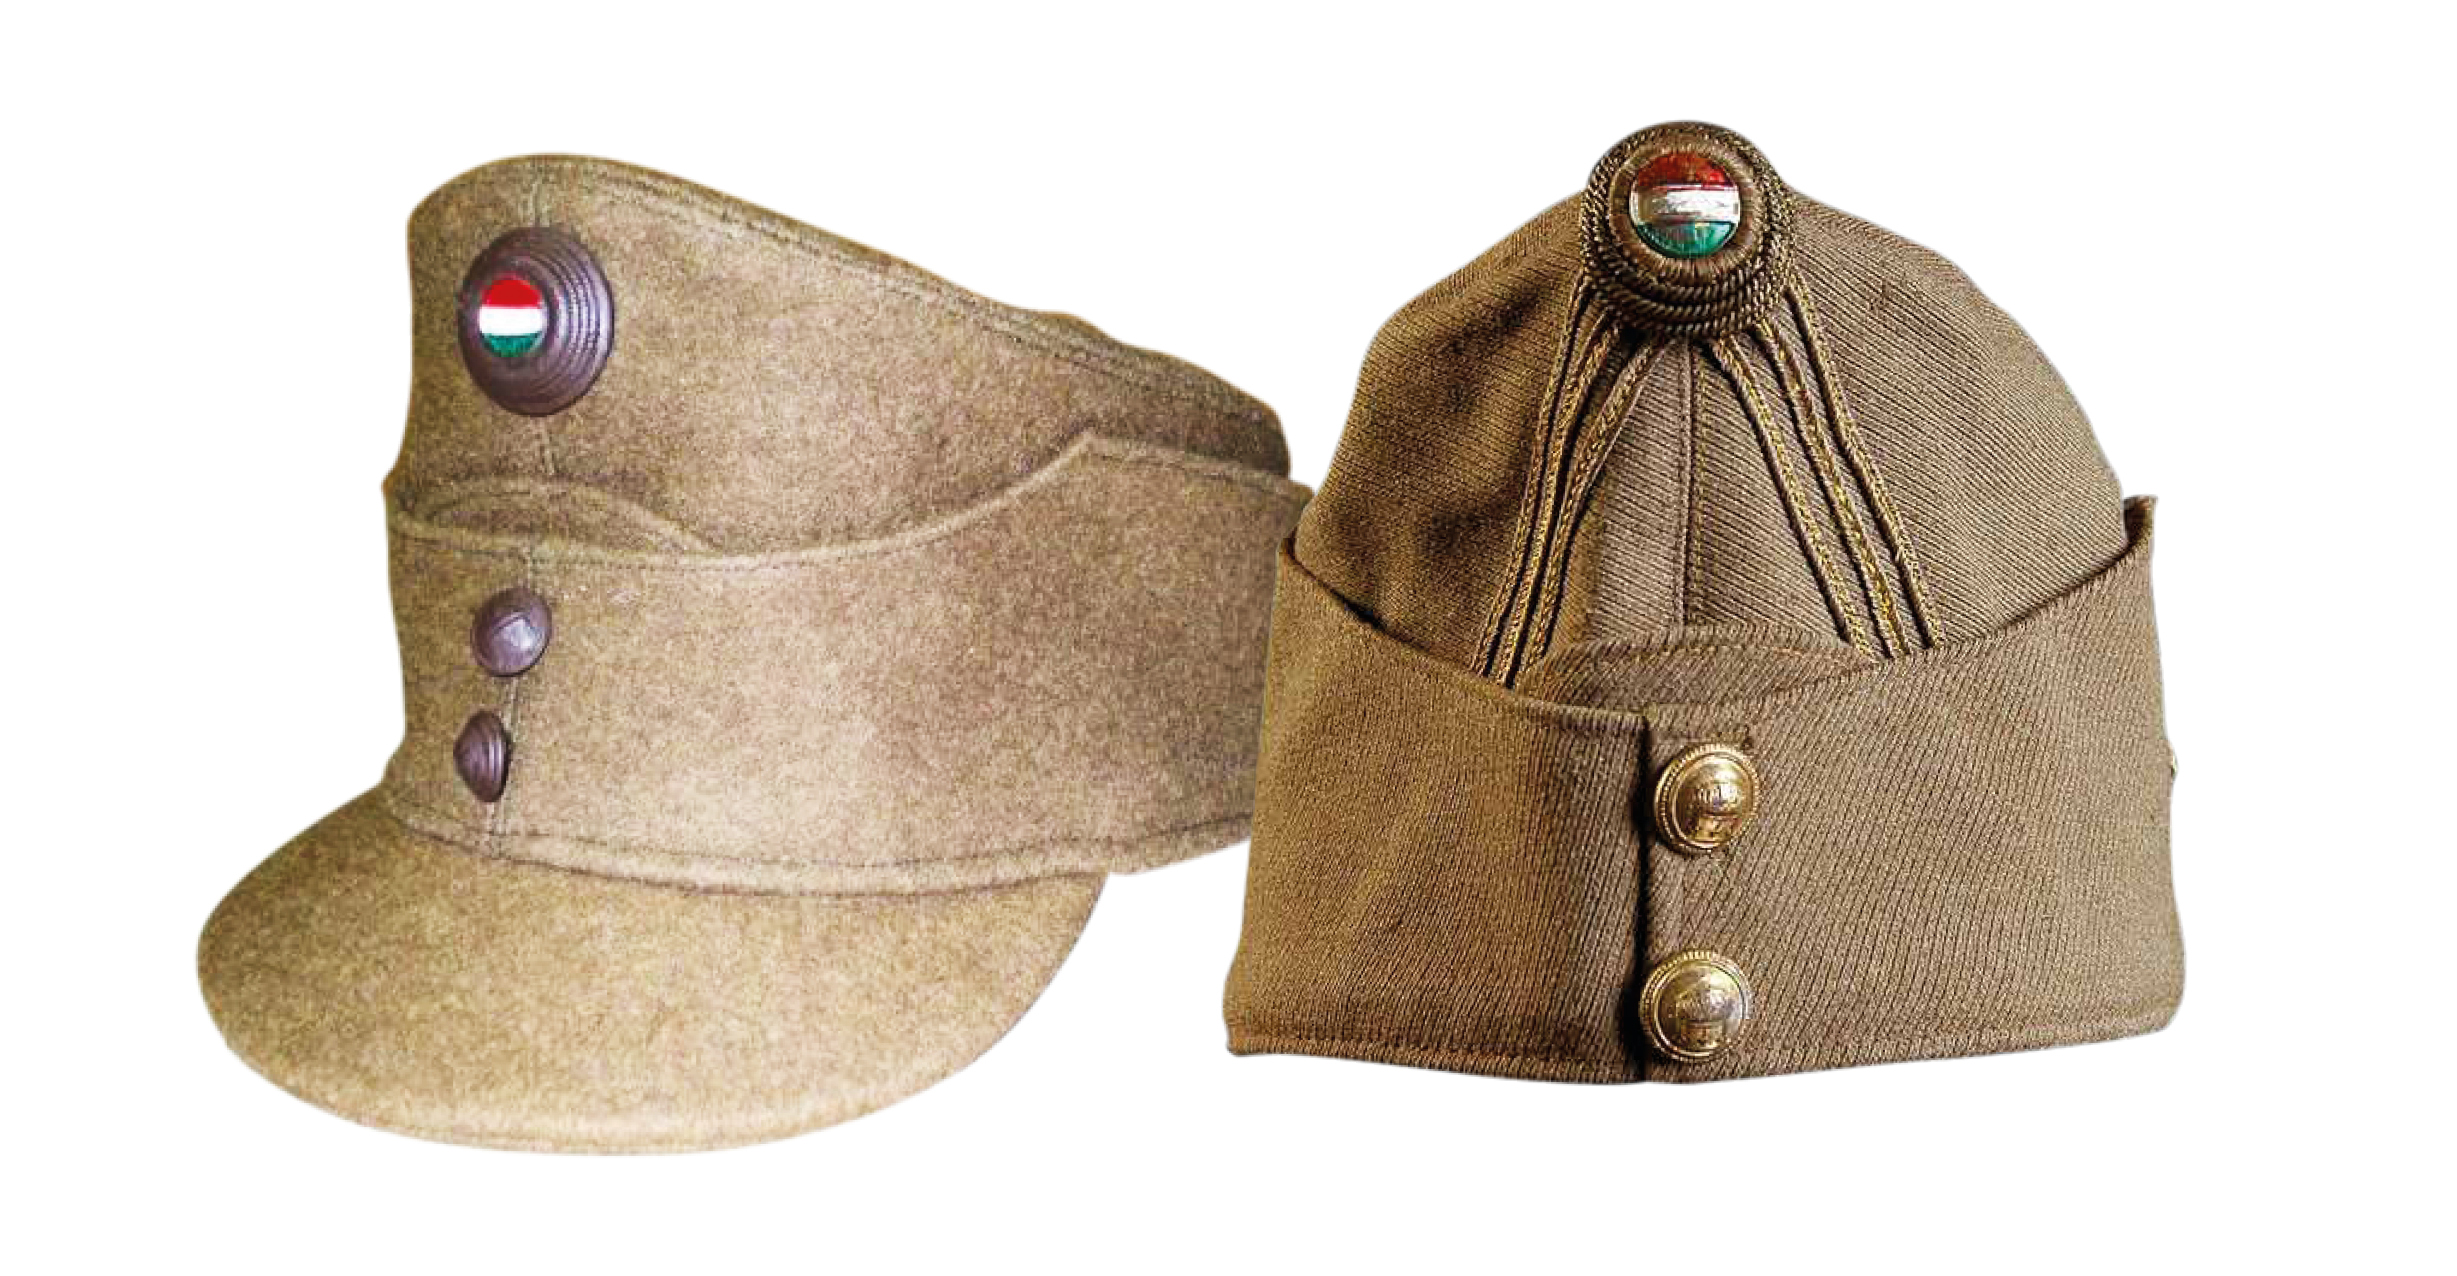
The models wearing soft caps feature a small shield on the front of them, these are painted in the Hungarian National colours, see the reference image below. Start by painting white underneath and then add a small strip of red at the top and green at the bottom, leaving the white in between, like an Italian flag that has been turned on it’s side.
Now that the miniatures are complete I suggest giving them a coat of matt varnish. I used a spray can of Testors Dullcoat.

Once vanished I finish the bases by adding snow (Valhallan Blizzard by Citadel) and winter tufts from Gamers Grass. And there you have it, some stout Hungarian infantry are ready to fight the Soviets.

You can use this guide for all Hungarian army troops, as seen below with some weapon teams and the HQ.

The larger bases needed for the team weapons allow you to add some elements to help set the scene. If you feel like going to some extra effort you can give the impression that your Hungarian platoon is fighting in the streets of Budapest itself by adding rubble and bricks as a start.

For my medium mortar team I have added some furniture from one of the opulent villas of Budapest, a grandfather clock. These pieces of miniature furniture can be obtained from hobby stores stocking dolls house accessories. I’ve also added some Hungarian propaganda posters to the base. These I found images of on the internet and printed off at roughly the right size on normal paper, cutting them out with a scalpel. Using PVA glue and water you can crumple and shape the posters with an old brush, to drape over the rubble and set hard.
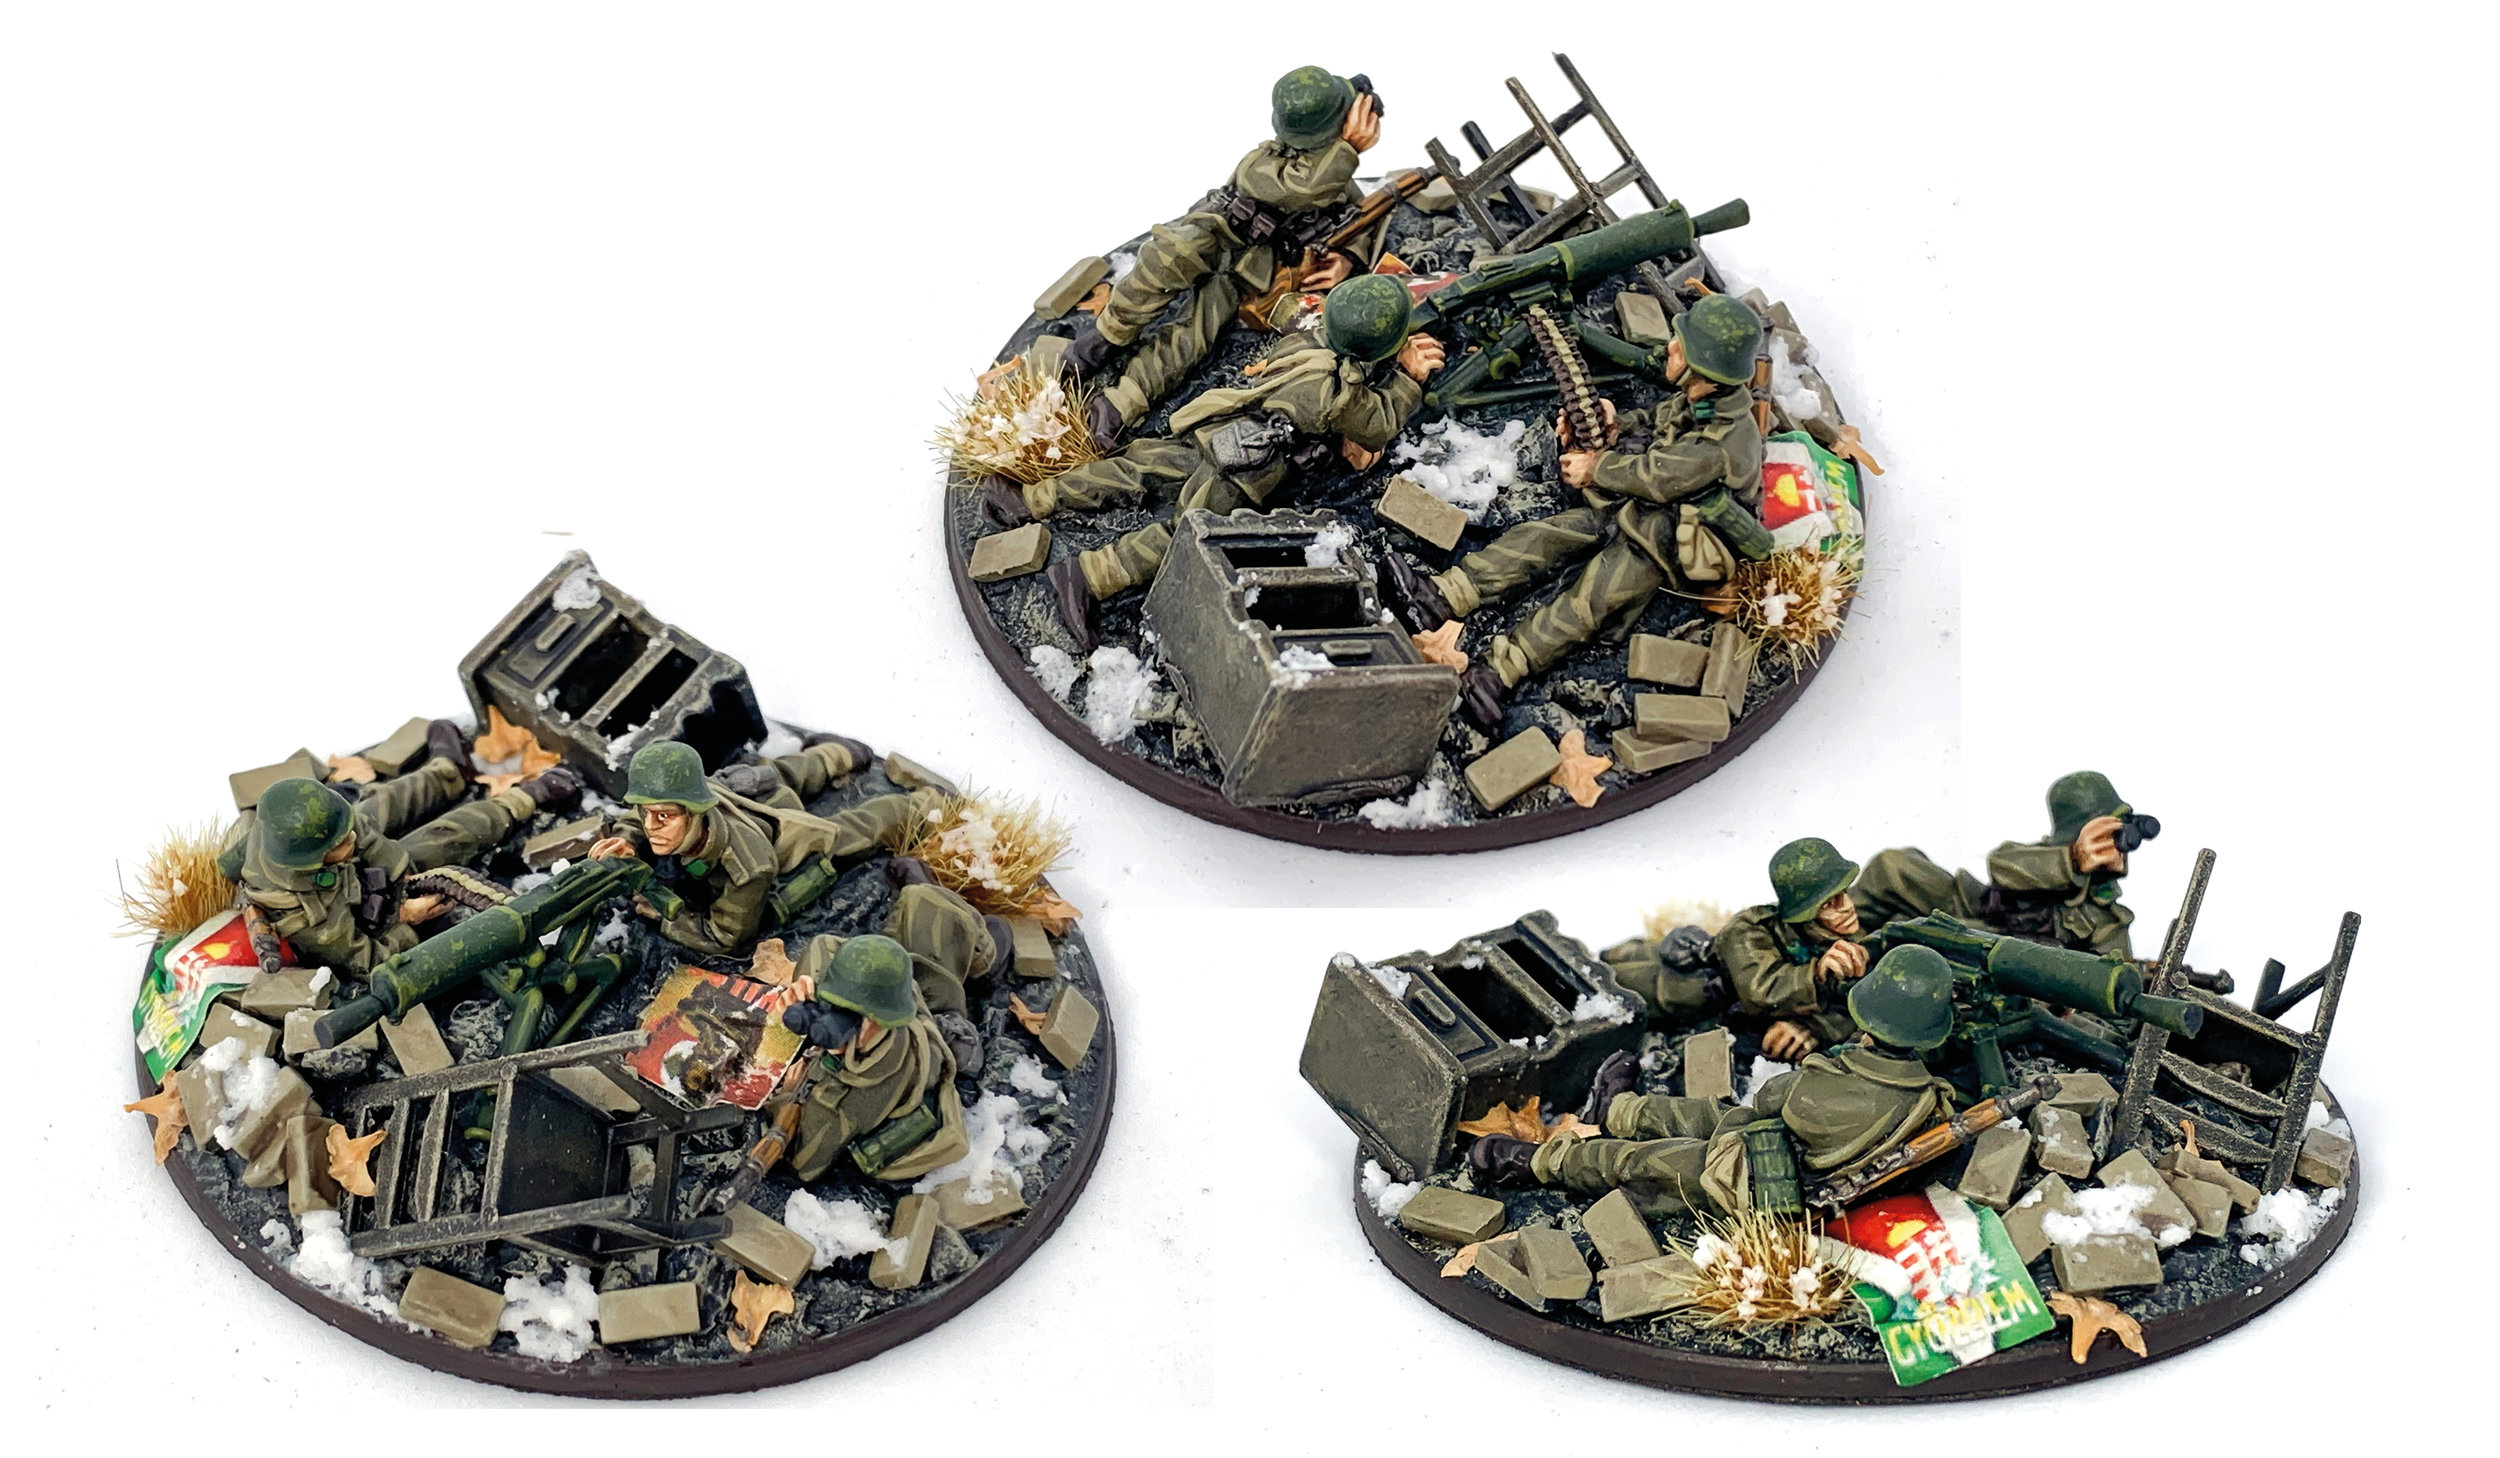
I’ve used the same idea for the Schwarzlose machine gun team and added discarded furniture and posters to capture that city battle look.

Good luck with your own Royal Hungarian Army platoon, I hope this article helps you on your way to have it painted up and on the table.
-Bryan