
Painting Table-Ready Vietnam Era USMC Miniatures

Like many of us, time is a precious commodity in my life and as much as I would love to spend three hours a night painting, it is just not realistic. Usually about 30 minutes to an hour on a good night is fair. The juxtaposition of time available to paint versus the amount of minis I have is an age old tale for nearly all hobbyists. I have since had to acclimate my painting style to a balance of getting them done and ready for table to perfecting every tiny detail. This will be my first guide and please let me know of any questions or comments you may have. It is a quick guide on how to get Vietnam era USMC or even US Army miniatures to a tabletop standard fairly quickly. I was able to knock out about five minis a night (drying time not included) using this method.

So lets begin with the paints you will need, where available I have listed both the Vallejo and Citadel (GW) equivalent. Be prepared to paint a lot of green!
Vallejo Russian Uniform primer (Not necessary)
Vallejo Russian Uniform/Citadel Death World Forest
Vallejo German Grey/ Citadel Corvus Black
Vallejo Brown Violet
Vallejo Flesh shadows/Citadel Bugmans Glow
Vallejo Flesh base/ Citadel Cadian Fleshtone
Citadel Deathguard green
Vallejo Stone Grey
Citadel Washes - Athonian camoshade, nuln oil, and reikland fleshshade
Vallejo Black ink (not shown)
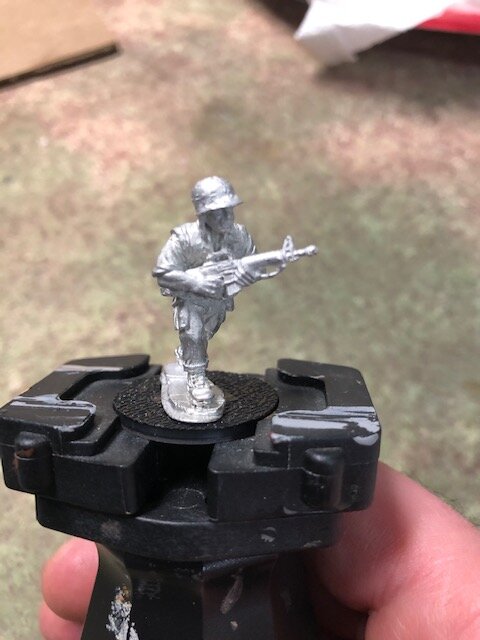
Our canvas for this project with be a Gringo40s Vietnam Marine Corps Riflemen miniature. I have painted about 50 of these minis and absolutely love them. They fit my painting style of being a little chunky and forgiving as precision with a brush is not my strong suit. I highly recommend Empress miniatures line of Vietnam miniatures as well, I have both and could not be happier.

Our first step is to prime the mini. If you have a russian uniform colored primer like the vallejo one above it does make it a bit easier but overall not necessary. You can prime in black as well which does help with shadows and layers later on. Also do not forget to prime the underneath the miniature as well (I somehow always miss these spots and have to go back later on)

Our primed miniature. If you were unable to prime in russian uniform then at this time base coat the miniature in Russian uniform, leaving the rifle, bayonet scabbard, and leather parts of the boots. Also at this time we will paint all the flesh the base colors (vallejo shadows/Bugmans Glow).

For the third step we will use German Grey/Corvus black to put a base coat on the M16 and the leather parts of the jungle boots. The jungle boots had a green mesh on the sides so remember to leave those green.

If you look at color pictures of Marines from Vietnam you will see their uniforms all blend intogether with about 345 different shades of green due to sweat, climate, and wear. The most difficult part of painting these minis is having different shades of green so they do not just end up looking like a green blob.
At this step we will use Vallejo brown violet to paint the flak jacket. Alternatively to add some different color you can use Vallejo khaki grey or even green brown. As I stated above, just about any shade of green/brown will work.

And now we have reached my favorite part of painting a mini..THE WASH! This is where the mini really starts to come together. Brush on a coat of GW athonian camoshade all over the uniform and helmet. Clean up any areas that is has pooled as well. Brush on GW Nuln oil onto the M16 rifle, bayonet scabbard, and the black part of the boots. Let the wash dry completely before moving onto the next stage.

Now that our wash is dry, start bringing up a highlight using the base colors from previous steps. Make sure not to paint in the folds or crevices of the mini, we want to leave those dark to show depth. Here I have just repainted the trousers and blouse with Russian uniform on all the raised areas. Same with black grey on the boots and rifle.

For one of our final steps we will bring up the highlights to personal preference. I tend to add Vallejo stone grey to the Russian uniform for my highlights, alternatively you can use GW Deathguard green. Add stone grey to the German grey/corvus black and pick out toes of the boots and the raised area of the M16 like the forward assist and dust cover. For the flak jacket I used stone grey added to the brown violet to highlight and add a slightly different shade of green. *My apologies as I did not get a good picture of this step.

You can see faint black lines around the straps, webbing, shirts sleeves, and other areas.
I put this picture of work in progress miniatures to show the black lining process. Using the Vallejo ink and a very sharp tip of your paint brush you line the boundaries of the different color areas of your miniature. This creates an extra layer of depth and really helps to break up all the green tones.

Our final step is to base the miniature, everyone has their own personal way of basing so I will not go into detail on basing. In regards to the helmet, at this stage I blot on the 34 different shades of green we have used and then smudge them with my thumb to create a washed out faded effect. If you want to add a touch of light brown in their to help with the pattern that will go well too.
Using this guide should allow you to do five or more miniatures a night to get them ready for the tabletop. If I spend to much time on a project then I tend to get burnt out and end up with a garage load of half painted armies. By finding a right balance of quality and time spent per mini, I have been able to field a number of armies recently and they look just dashing on the tabletop in my eyes.
May your dice be hot and your drinks cold,
Casey