
WW2 Australian Matilda Tanks painting guide

Australian Matilda II tanks
Bryan’s step by step painting guide
Hi guys, welcome to another step-by-step painting guide, this time for the Australian Matilda II tanks operating in the jungles of the Pacific in the Second World War. What follows is a guide, broken down into easy to replicate stages which covers the painting and weathering of the tanks. The method can easily be adapted for other Australian, US or British vehicles in the Pacific or Burma. This guide is also great for any Sci-fi vehicles you may like to have in a muddy or jungle setting.

Step 1 - add mud texture
An optional step to take is to add some mud texture before painting the tank. I achieved this by smearing some poly-filla (no more gaps) from the hardware store around the bottom of the hull and tracks. This will give some volume to the mud I will add later. It’s no entirely necessary but if you want a serious amount of mud on your vehicle it is a cool effect.

Step 2 - Colour primer
Now, onto the painting! First up, I began by priming the tank with a black spray (GW Chaos black in this case). Over this, once dry, I sprayed a base colour standard for British armour. I have found a good representation of this is the British armour spray by The Plastic Soldier Company.

Step 3 - Drybrush highlight
To add some some depth without using an airbrush, start by dry-brushing a highlight across the tank. Using a 70/30 mixture of Vallejo 924 Russian Uniform and Vallejo 819 Iraqi Sand, drybrush the edges of the armoured hull with a large soft brush. Cheap large makeup brushes off Ebay are perfect for this. I have found brushing in a downward direction even adds some nice streaks on the larger hull areas, see the above photo for reference.

Step 4 - Base colours
Next, after the messy drybrush stage, it’s time for painting the base colours of the rest of your tank. If you have a choice, choose a lighter colour than you might otherwise for the base as the enamel wash that comes later will darken things up a little. In the example of my Matilda, I used Vallejo 984 Flat Brown for the tracks (including spares) and PSP, then drybrushed them with a silver. The stowage is one of three colours, 881 Yellow Green, 988 Khaki and 888 Olive Grey.

Step 5 - Decals and gloss varnish
With the base colours done, it's time to add any decals you plan on including. I picked up a specific Australian set for the 4th Armoured Brigade from Company B. These are 1:56 scale and work really well. I love the Brigades symbol of the Crocodile and palm tree, very Australian!
When applying decals, first paint on a layer of gloss varnish in the general area you know a decal will go. Once dry, apply the decal. The gloss varnish provides a very smooth surface for the decal to apply too. Lastly, apply a coat of gloss varnish to the entire model. This is going to protect the colours underneath from the enamel weathering products we'll use in the following stages.

Step 6 - Apply Wash
With base colours and decals done, next is a wash to add depth the vehicle. For vehicles I am a big fan of using oil & enamel based paints and products like this wash by AK Interactive for example. These washes work in two stages, first you apply them, then you remove some of it to create smooth transitions or streaks. So here, looking at the picture above you'll see I only paint the wash into the recceses, but am not overly neat or careful with this. This is refered to as a pin wash, pin for pinpoint. This wash, Dark Brown Wash for Green Vehicles by AK Interactive, is an enamel product, so make sure to use a thinner like mineral turpentine to clean your brush afterwards, not water! It’s best to wait about 45-60 minutes before jumping onto the next step…but don't wait to much longer to start cleaning it up or it will be permanent.

Step 7: Clean up wash
Now for stage two of the wash, cleaning it up. Using some thinners, dampen a make up remover or small brush (like in the photo above) and wipe away any areas you don't want the wash. You can also use a dampend rag to wipe over the large areas of the hull. You'll notice adding the thinner 're-activates' the wash, so you can effectively move it around. One cool trick is to remove the wash by wiping down the armour plates as this will create some streaking effects. Perfect for jungle tanks out in the rain and muck. When removing some areas of the wash I keep a paper towel or rag handy to deposit the wash onto as the tool (brush or make up remover) takes it off.

Step 8: Heavy mud effects
Okay this next step is a lot of fun, time to add mud! I picked up this great set of mud effect products from AK Interactive, called the Heavy Muddy weathering set. It seems to be easily available online and wasn't too expensive, $30 Australian. The set has 5 products inside, of which I ended up using 4 on these on the tank. To start off I used the 'Damp Earth' pigment mixed with the plaster in the set at a 50/50 plaster to paint ratio. I also added some static grass flock for extra texture, as I wanted some foliage to be caught up in the tracks and mud, as I had seen this in many of the historical photos.

Using an old brush I mixed these three ingredients up and set to work just splattering it roughly onto the vehicle as you see in the photos above. I tried to imagine where the mud and foliage would get caught up on the vehicle. This mud mix dries fairly fast so get right into it! Wash your brush out in thinners, not water.

Step 9: Dry mud effects
To add depth to the mud (New Guinea is a very muddy place!) I utilized another product from the Heavy Muddy weathering set.. This was the 'Summer Kursk Earth' pigment. As before I mixed this 50/50 with the plaster provided in the set. This time however I did not include the static grass. I also applied this dried mud differently. Instead of painting it on with a brush, this time I loaded my brush up, but used my breath in short sharp bursts to blow the paint onto the tank and achieve these organic looking splatters you see in the photo above. This takes a little practice and is messy, so be sure to cover your work area with some protection as the paint goes everywhere!

Step 10: Crew & stowage
With the weathering now complete, finish painting the crew and stowage to your liking in your normal method for infantry. My method for Australian infantry in the Pacific is right here. I do this last to avoid any of the weathering products going over these parts, which tends to happen. So this saves on clean up time.

Step 10: Matt varnish and jungle foliage
To finish off your jungle tank give it a coat of matt varnish, to protect all that hard work. I use Testors Dullcoate. I also prefer to base my vehicles, as you can see I have added some appropriate jungle basing material I have collected. Even if you don't base your tanks, you could very easily add a few bits of vegetation to the upper hull of your jungle tank to simulate foliage raining down on the vehicle as it bashes it's way through the jungle.
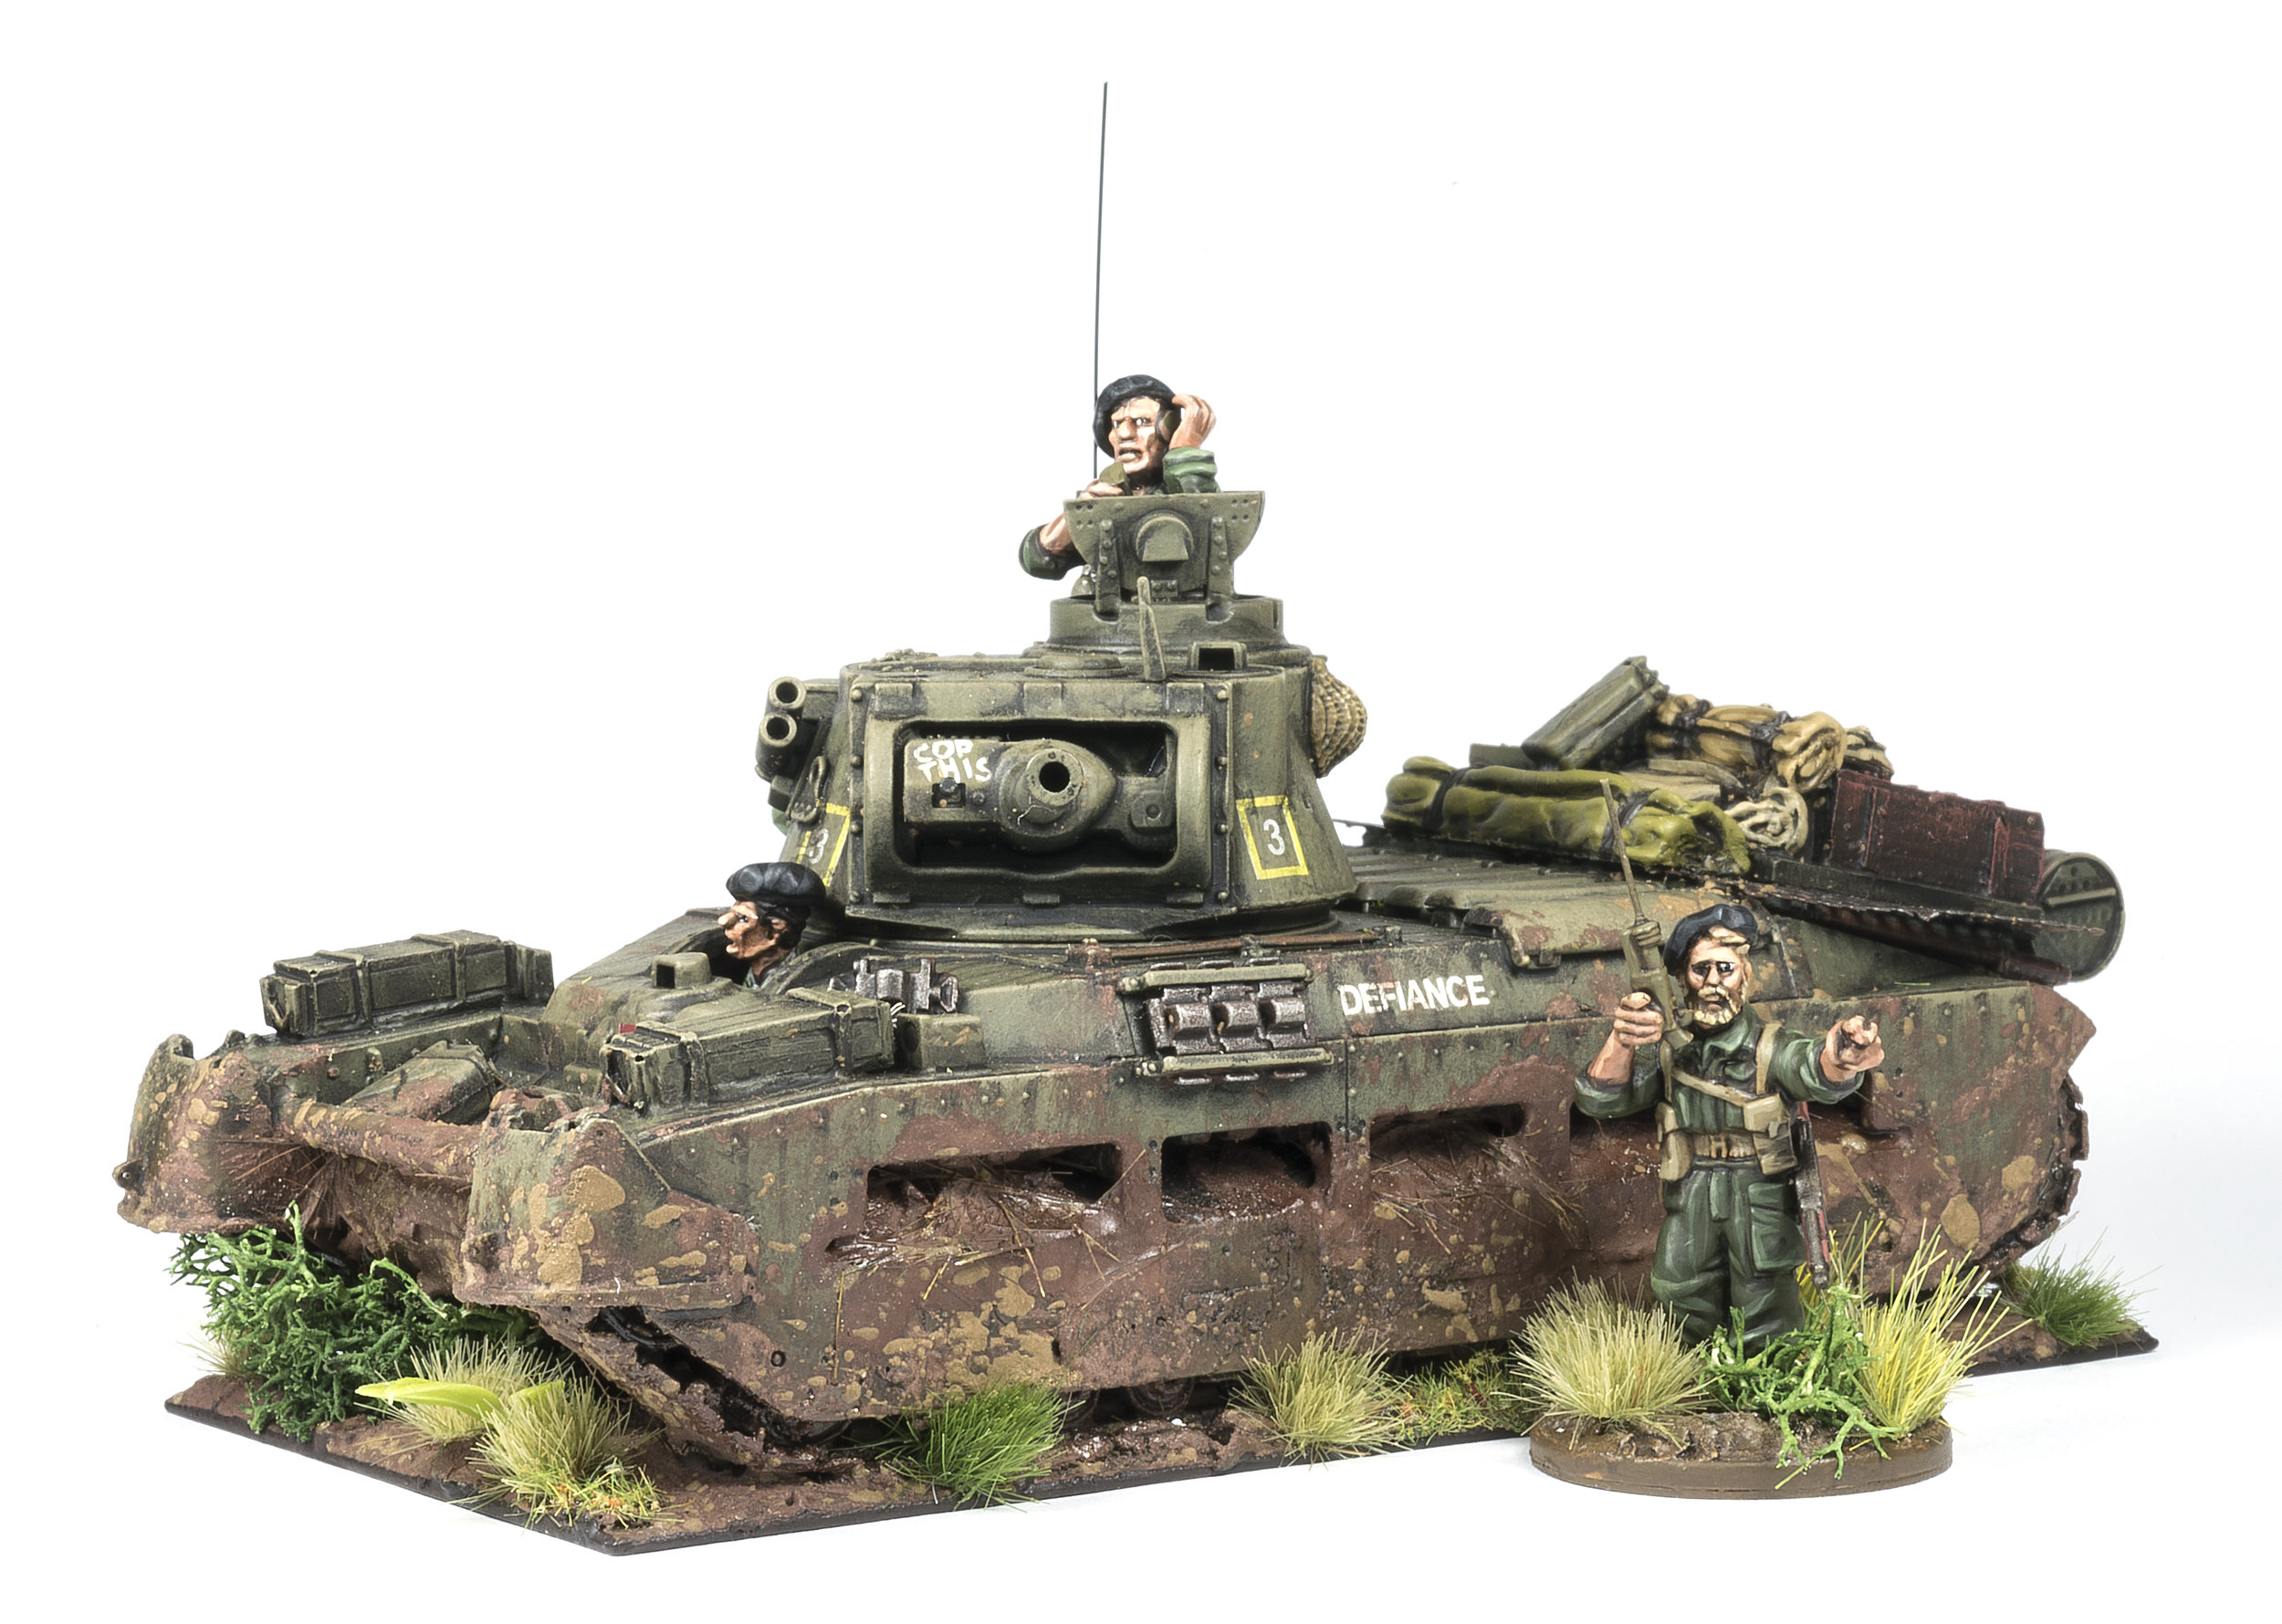
So there you have it, some ideas for giving your Pacific or Burma forces vehicles a really 'jungle' look. It was my first time trying out the AK Interactive Mud set and I found it fun and easy to use. However I may have gone a bit overboard with it, so you may want to follow the old adage...less is more!

