
A Quickly And Effective Guide To Painting and Adding Stowage To Your Armour
Hi all, welcome to my second tutorial here at Paint All The Minis. This time I am going show you how I add effective looking stowage to my tanks and how I paint those self same tanks and it’s stowage quickly and effectively, just like it says in the title! :D
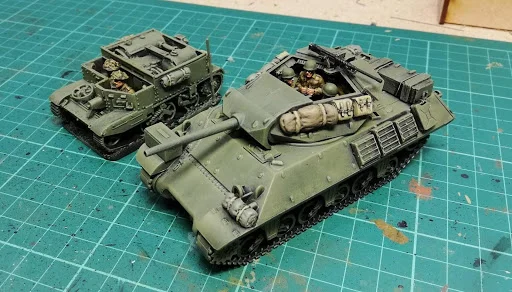
I am using a Warlord M10 Wolverine for this tutorial, occasionally you will see a Universal Carrier Wasp in the photos, that is there because it got the same treatment as the Wolverine at the same time and it looks nice.
I will add that this tutorial only covers adding stowage and the quick painting method. It doesn’t cover adding decals and weathering. As you can see I did paint the crews, I won’t cover that either, I just had to get them done to satisfy my painting urge; in fact the whole project was done because I really, really wanted to paint them. If you want to know how I paint the crew I will be happy to cover that afterwards.
Stowage
If you look at many photos of armour in combat you will see that they are usually bedecked with stowage. The interior of tanks and armoured vehicles is pretty cramped as they are designed, mostly, for efficiency; crew confort usually taking a distant second place. So crews would inevitably carry all those little nick nacks that make life in the field a little less stressful and a lot more bearable on the exterior of their vehicles. (Note. A great source for armoured vehicle painting, weathering, stowage adding etc are the many 1/35th scale models that can be found online simply by typing in 1/35th scale WW2 Wolverine in this case but whatever vehicle you are working on, there will be a photo online somewhere of one built by some sickeningly talented model AFV fan )
Inspired by the painting above, taken from the Osprey Vanguard Series No 10 Allied Tank Destroyers, I set about adding stowage to my Wolverine. I added it before the painting stage as it can be painted at the same time as the rest of the vehicle.
I sourced my boxes, packs and crates from a variety of places; there are plenty of manufacturers out there that make them but for the record the large crate and the smaller .50 cal ammo tins are by Anyscale Models, the jerry-cans are from Tamiya’s 1/48 scale jerry-can set and the crew webbing packs are spares from Warlord Games British Infantry. The tool box on the front track guard is from Rubicons German Stowage set.
Top tip; When adding your stowage make sure your turret can rotate 360 degrees without catching on the stowage.


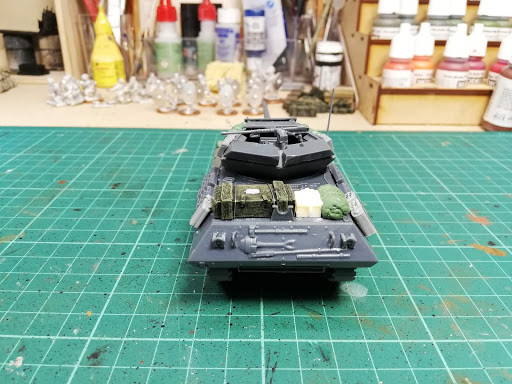
The ropes holding the jerry-cans and wooden crate in place are pieces of thin, flexible wire that I buy from a cake decorators (my missus is a keen cake baker and decorator) and, being dragged into her favourite cake supply shop I had to wile away the time somehow so I had a look about to see if there was anything I could use in converting and constructing my kits and figures and, lo and behold, I found this stuff. It comes in various thicknesses, is paper covered and is used to make structures and armatures for cake decorations; it’s also very handy for representing scale rope etc….but I digress
The tarps and rolled up tents were made using Green Stuff that I rolled into a sausage shape the length and width that I required, stuck on the side of the tank, the Green Stuff being tacky enough to stick without using an adhesive. Next, i dipped my finger in some water and smoothed out the Green Stuff to remove my fingerprints from the surface.
I then teased it into the shape of slung tarpaulin held in place by straps using the various tools I have for that purpose; dental scrapers and an old craft knife. Dip these in water before using them on the Green Stuff to prevent it sticking to the tools. On either side of the straps make some indentations to give the impression of folds in the tarpaulin. With the craft knife I made a narrow slit along the bottom to represent the edge of the tarpaulin and, back to the dental scrapers, I teased out some fairly convincing looking rolled edges. That doen, set it aside to dry and DO NOT forget that the Green Stuff will still be soft for a while and then go and pick up the vehicle by the turret and flatten the tarpaulin!! .
Painting
After the Green Stuff has dried it’s time to paint your wagon!! (Note; you don’t have to be born under a wandering star to do this :D ) okay, now that that ear worm has been planted on with the tutorial.
Firstly I primed the Wolverine black (and the Wasp...really looking forward to getting that into battle)t . I used Citadels Chaos Black because I like it and I can. It’s up to you what primer you use just as long as it is matt black.
To paint the Wolverine (and Wasp) I am using only three colours US Dark Green, Russian Uniform WWII and Khaki
When I was ready to start painting I put out some Vallejo 70.893 US Dark Green mixed with some water to a milky consistency and, using a large, fairly soft bristled brush, I dry brushed the Wolverine all over, quite vigorously., repeating it where necessary and making sure I got into all the nooks and crannies.
...till I was left with this result
Next up, mix some US Dark Green with some Vallejo 70.924 Russian Uniform; about 50/50 though I usually just judge by eye. What you want is a tone noticeably lighter than the first dry brush. Again dry brush this on but with a bit less vigour. You looking to catch the raised surfaces and leave areas immediately surrounding the raised detail US Dark Green.


Repeat the process but just using Russian Green, this time more gently as you just want to catch the raised parts and edges
Finally add some Vallejo 70.988 Khaki to the Russian Green and, focussing mainly on the sharp edges and raised surfaces, give them a gentle dry brush and that’s the tank itself done.
When it came to painting the stowage I went with using just two colours, mainly because I intended to leave the jerry-cans and ammo crates the colours they were. For the tarps and straps I used US Dark Green, German Cammo Medium Brown and good old Khaki once more. I also mixed a little bit of black with some German Cammo Medium Brown as a base coat.
I then added progressively lighter tones of German Cammo Medium Brown and Khaki in the same manner as you would paint clothing on a figure to achieve the desired result. The crews small packs were based with a mix of Khaki and a touch of black, enough to make it noticeably darker then, similarly, painted it in progressively lighter tones as were the straps on the tarpaulins and the .50cal ammo cases. The ropes holding the stowage were given a touch of the khaki and cammo brown mix, again enough to contrast them against the green of the jerry-cans and crate.


Then I got carried away and painted and added the crews. And, as they are, they wouldn’t look too disgraceful on a wargaming table. This method works really well with vehicles that have rounded surfaces such as Shermans and T34s etc and the same method can be applied to early war German vehicles only in this case you would use German Grey and Neutral Grey for the dry brushing and highlighting.

Well I hope this tutorial is of some use to you. Thanks for sticking till the end and if you have any questions or comments feel free to post them below.
Jim Bob